How to Cover a Broken Window Temporarily

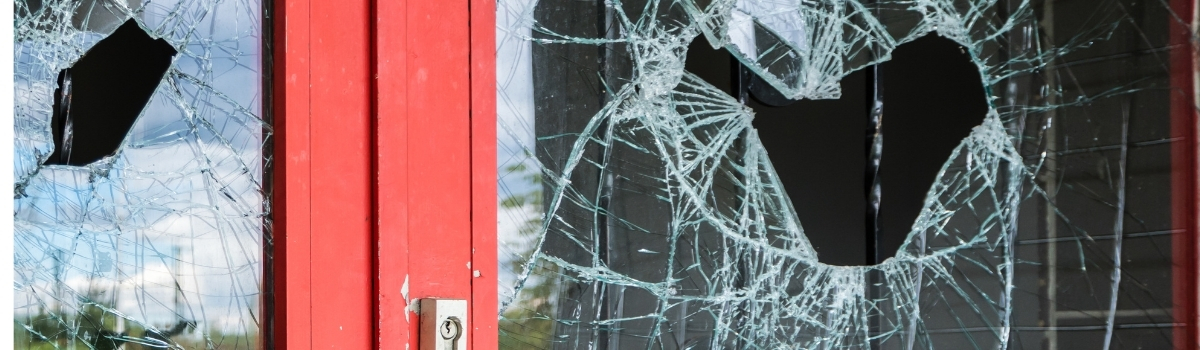
A broken window can turn into a significant issue if not addressed quickly, exposing your home to the elements, security risks, and potential injury. Temporary fixes are a practical way to secure your space until professional repairs can be arranged. This article explores effective solutions, their advantages and disadvantages, and safety tips to keep in mind.


Assessing the Damage

Before applying a temporary fix, assess the situation to choose the most appropriate method:

  1. Inspect the Window:
    Determine whether the glass is cracked, shattered, or entirely missing. Identify loose pieces that may fall or cause injury.

  2. Remove Loose Shards:
    Use thick gloves to carefully remove broken glass from the frame. Place shards in a sturdy container for safe disposal.
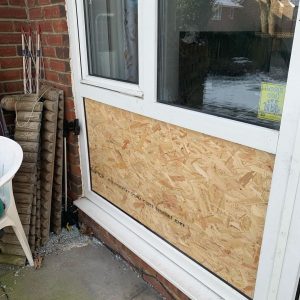
  3. Examine the Frame:
    Ensure the window frame is intact and stable enough to hold a temporary covering. If the frame is compromised, professional help is needed immediately.

Effective Temporary Fixes and Their Pros and Cons

1. Clear Packing Tape or Duct Tape

  • Best For: Small to medium cracks.

  • How to Apply:
    • Clean the surface of the crack to remove debris.
    • Apply strips of tape over the crack, ensuring it’s fully covered. For extra security, tape both sides of the glass.

Advantages:

  • Quick and easy to apply.
  • Inexpensive and widely available.
  • Prevents the crack from spreading further.

Disadvantages:

  • Offers minimal insulation against drafts or weather.
  • Not suitable for large cracks or shattered sections.
  • Adhesive may weaken over time, requiring reapplication.

2. Plastic Sheeting or Heavy-Duty Garbage Bags

  • Best For: Completely shattered or missing panes.

  • How to Apply:
    • Cut plastic sheeting or a garbage bag to fit the window, allowing some overlap.
    • Secure the edges to the frame with duct tape or staples.
    • Stretch tightly to reduce flapping and improve insulation.

Advantages:

  • Protects against weather and debris.
  • Affordable and easily customizable.

Disadvantages:

  • May tear in strong winds or prolonged use.
  • Limited insulation compared to other methods.
  • Not as secure against intrusions.

3. Cardboard or Plywood

  • Best For: Missing panes where security is a concern.
  • How to Apply:
    • Measure the window opening and cut the material to fit.
    • Attach the piece using screws, nails, or heavy-duty tape.

Advantages:

  • Provides strong security against intruders.
  • Offers better weather protection than plastic sheeting.

Disadvantages:

  • Reduces natural light, leaving the space darker.
  • Requires tools for proper installation.
  • Less effective for insulation during cold weather.
 
Boardup - cover windows temporarily

4. Bubble Wrap

  • Best For: Insulation during cold weather.

  • How to Apply:
    • Cut a piece of bubble wrap to fit the damaged area.
    • Spray the window with water to help the wrap stick.
    • Secure the edges with tape for added stability.

Advantages:

  • Excellent insulation properties.
  • Easy to apply and adjust.

Disadvantages:

  • Not suitable for large or completely missing panes.
  • Offers no security or weatherproofing.
  • Adhesive may weaken, requiring reapplication.

Safety First

When dealing with a broken window, safety should always be your priority. Follow these precautions:

  • Wear Protective Gear: Gloves, goggles, and closed-toe shoes are essential when handling glass.
  • Secure the Area: Keep children and pets away from the broken window to avoid injuries.
  • Dispose of Glass Safely: Wrap shards in thick paper or place them in a sturdy container before disposal.

Common Mistakes to Avoid

Temporary fixes can fail if not done correctly. Steer clear of these errors:

  1. Using Flimsy Materials:
    Thin fabric or newspaper may block visibility but provides no real protection against weather or intruders.

  2. Ignoring Proper Sealing:
    Gaps in your temporary cover can let drafts and moisture in, leading to additional damage.

  3. Leaving Glass Shards in the Frame:
    Unremoved shards pose an injury risk and can interfere with applying a secure cover.

  4. Procrastinating Repairs:
    Temporary fixes are not designed for long-term use. Delays in professional repairs can lead to frame damage or increased costs.

How Long Can Temporary Fixes Last?

Temporary solutions are meant to last only until professionals can repair the damage. Here’s a general guideline:

  • Clear Tape: 1–2 weeks for minor cracks.
  • Plastic Sheeting or Garbage Bags: Up to a week, depending on weather conditions.
  • Cardboard or Plywood: Several weeks but may need reattachment in harsh weather.
  • Bubble Wrap: 1–2 weeks for insulation.

Conclusion

Temporary fixes for broken windows are essential for protecting your home from weather, intruders, and further damage until professional repairs are done. Solutions like tape, plastic sheeting, cardboard, and bubble wrap can address different levels of damage, but each has limitations and is only a short-term measure.

Prioritize safety by wearing protective gear, removing loose shards, and ensuring a secure application of your fix. Remember, these solutions are not permanent—contact a professional promptly to restore your window and prevent long-term issues.

About the Author
Picture of David Chahine

David Chahine

David has over 5 years experience providing glass repair and replacement and is also the owner of Primal Glass Replacement